The Village - Gifting diy Morse code bracelets
CREATE
Gifting DIY Morse code bracelets
By Melissa Thibodeau
I just love a good craft project that’s cute, educational, unique and giftable. With the holiday season in full swing, here’s a thoughtful present kids can easily make for all their friends using Morse code. Aside from the fact that they’ll learn this really cool language, they’ll also be spending some time reflecting on how well they know their friends and what they mean to them, which, if we’re lucky, will lead to gratitude and a full heart. This is actually what first appealed to me as I looked for something cool that my girls could make for their friends.
But first, a word about the origin of Morse code
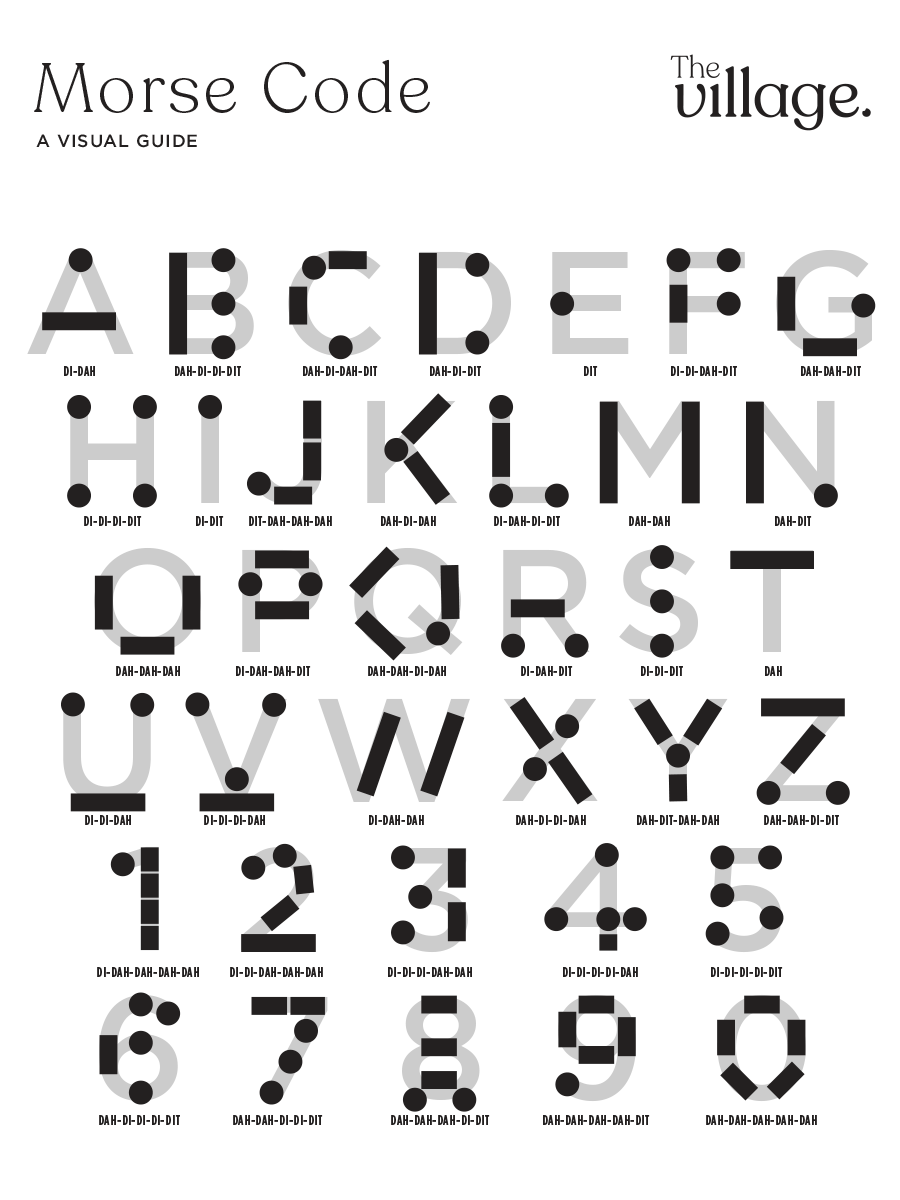
In 1836, Samuel Morse, Joseph Henry and Alfred Vail invented an electrical telegraph system that could send messages using short and long pulses of electricity. In order to turn the pulses into readable text, Morse code was created where each letter and number were associated to a combination of dots and dashes (also called dits and dahs, an onomatopoeia of the sound the telegraph machines made). Morse code was an international telecommunications standard for over a hundred years and today, Morse code is still commonly used in various situations and to send emergency signals. You probably already know this distress signal: · · · — — — · · · This corresponds to the letters S-O-S in the Morse code alphabet.
Kids can have fun learning and using Morse code in play. “Secret” messages can be sent in a variety of ways using flashlights, mirrors, walkie-talkies or they can send them in print. These personalized gifts are great, not only for the holidays but for birthdays, Valentine’s Day, Mother’s Day, Father’s Day and any other occasion. I really love this post by Alphamom.com about her daughter’s pyjama party that included a little Morse code diy sesh.
Supplies:
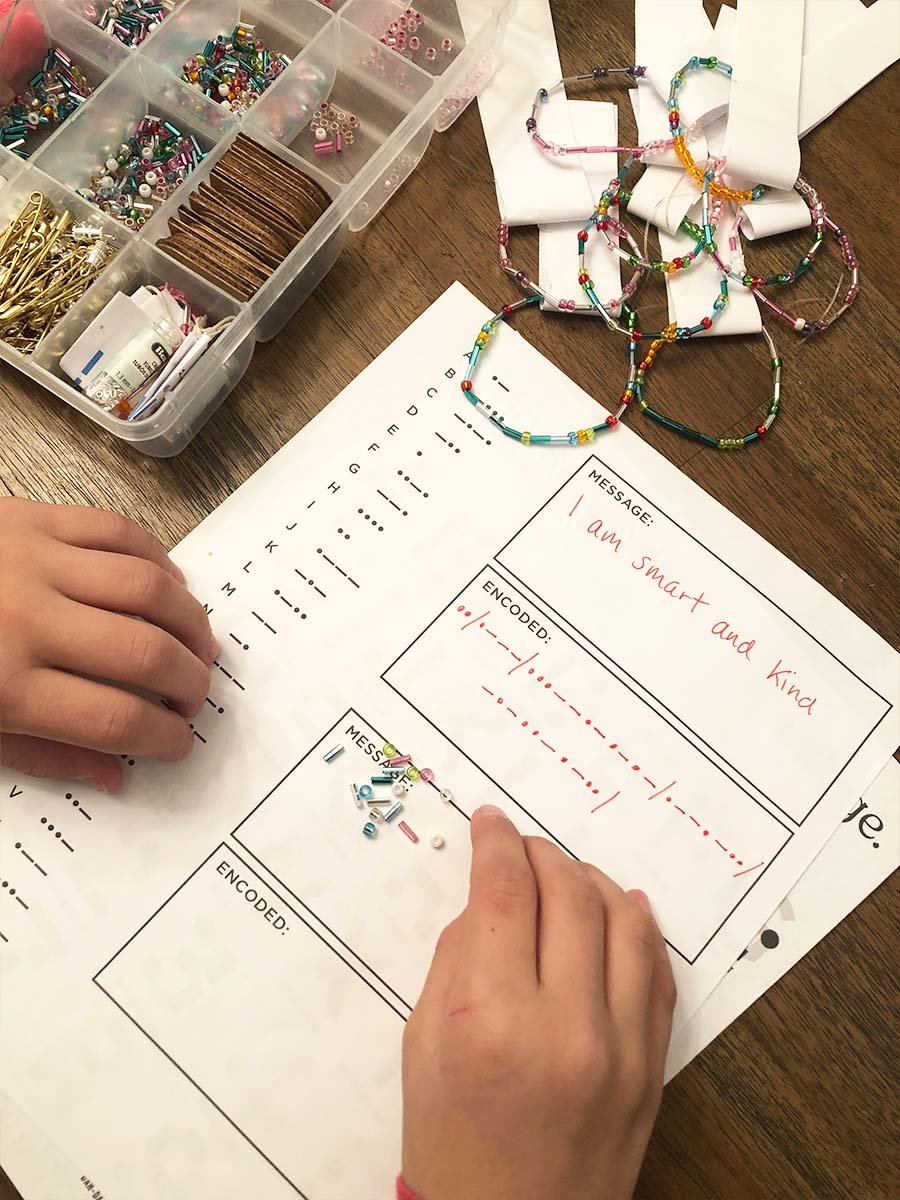
- Morse code alphabet work sheet printable (print ours)
- Glass bugle beads (I got ours from Michaels but you can get these from Amazon)
- Glass beads (I got ours from Michaels too but Amazon has this great kit)
- 0.5mm elastic string (you can find spools at the dollar store, craft store and on Amazon)
- Card stock or blank cards for gift-giving
- Scissors
- Optional: markers, glitter, stickers (whatever you have on hand)
Instructions:
- Decide what “secret” message you want to encode with beads. It can be something as simple as the friend’s name, something they really love, a pet, a favourite creature, video game or sport. It could also be empowering words or positive affirmations that mean something to the friend they’re making the bracelet for, like “I am strong”, “Dream big”, “I can do it”, etc.
- Next, using the work sheet, write the secret message on one line, and below it, using the Morse code key, encode the message using the correct sequences of dots and dashes for each letter. If there’s more than one word, use a / to separate your words.
- Decide on a colour scheme for the beads. The beads represent the dots, while the bugle beads represent the dashes. Some kids love symmetry and repeat patterns that are cohesive, while other kids like to mix it up, or even follow the order of rainbow colours (ROYGIV). My girls like repeat patterns, like having one colour for the dashes and one colour for the dots. We also reserved one colour as the “filler” bead, in the event that the message is too short for the length required to fit a wrist. Using the same bead colour as the filler also makes it easier to see where the Morse code message begins and ends. You can also use this same colour to separate your words, if your message contains more than one word.
- Cut a length of elastic string that’s longer than the size of the wrist so that you can easily tie the finished bracelet together. Make a loose knot on one end so that the beads don’t slip off as you string the beads.
- String your beads following the Morse code sequence you wrote out in step 2. Your child can use their own wrist to gauge if filler beads are required to fill in the bracelet and make sure the string is completely covered.
- Once complete, tie the ends tightly together and finish with a triple knot (where you loop the ends three times), but not too tight where the stretch in the string is engaged and the finished bracelet contracts. Cut the excess string. I left about 4 cm so that they can be tightened again if needed.
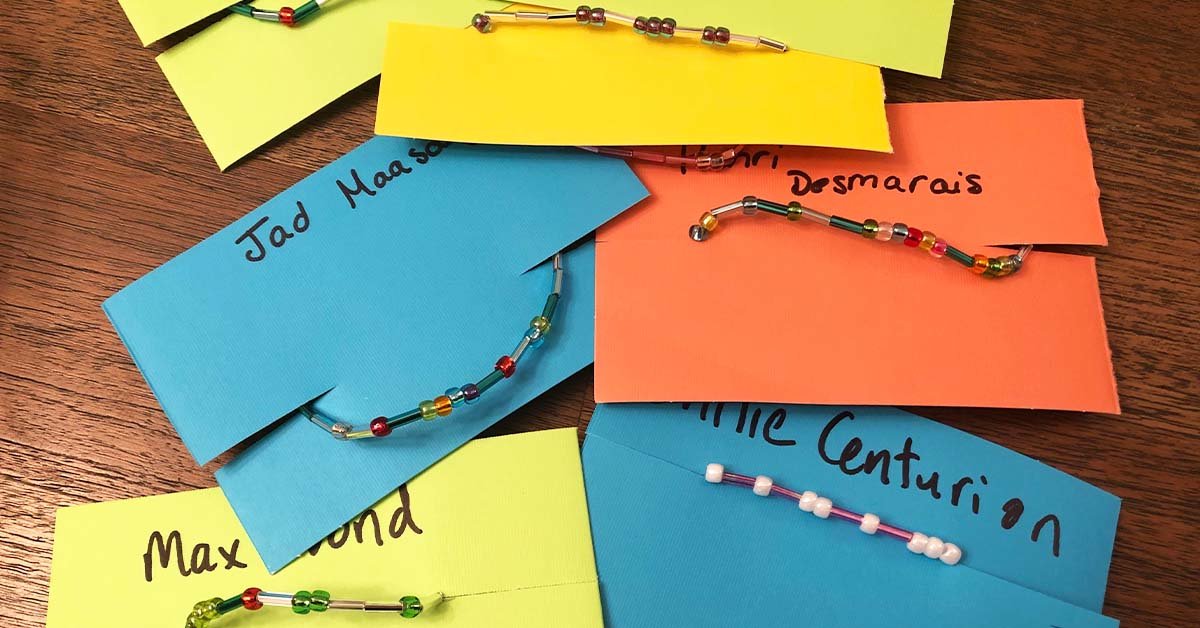
- The final step is all about presentation. Using some card stock or a blank card, write the message on the bracelet and the Morse code sequence. Decorate the rest of the card with markers, stickers, whatever you have on hand. Then make a cut of about 5 cm on each side. Stretch the bracelet over the card into the two slits you just made. If your card stock curls, make the cuts a little longer. You want the card to lie flat. Wrap in tissue paper, tie with a ribbon and voila!
In order to make a few of these bracelets at a time, it’s more efficient if you set up all the materials at a table and create a production line, starting with the Morse code message writing, followed by the bead stringing and finishing with the packaging.
Closing note: if your kids are learning to code, here’s how they can turn Binary code into bracelets too. I love this tutorial by Designmom.com.
About the author: Our senior copywriter, Melissa Thibodeau is a creative at heart, not just with words.
Crafting, baking, home decor and DIYs are her passions. When Melissa isn’t making something
with her daughters, you can find her in the garden
or biking in the woods.
CREATE
Gifting DIY Morse code bracelets
By Melissa Thibodeau
I just love a good craft project that’s cute, educational, unique and giftable. With the holiday season in full swing, here’s a thoughtful present kids can easily make for all their friends using Morse code. Aside from the fact that they’ll learn this really cool language, they’ll also be spending some time reflecting on how well they know their friends and what they mean to them, which, if we’re lucky, will lead to gratitude and a full heart. This is actually what first appealed to me as I looked for something cool that my girls could make for their friends.
But first, a word about the origin of Morse code
In 1836, Samuel Morse, Joseph Henry and Alfred Vail invented an electrical telegraph system that could send messages using short and long pulses of electricity. In order to turn the pulses into readable text, Morse code was created where each letter and number were associated to a combination of dots and dashes (also called dits and dahs, an onomatopoeia of the sound the telegraph machines made). Morse code was an international telecommunications standard for over a hundred years and today, Morse code is still commonly used in various situations and to send emergency signals. You probably already know this distress signal: · · · — — — · · · This corresponds to the letters S-O-S in the Morse code alphabet.
Kids can have fun learning and using Morse code in play. “Secret” messages can be sent in a variety of ways using flashlights, mirrors, walkie-talkies or they can send them in print. These personalized gifts are great, not only for the holidays but for birthdays, Valentine’s Day, Mother’s Day, Father’s Day and any other occasion. I really love this post by Alphamom.com about her daughter’s pyjama party that included a little Morse code diy sesh.
Supplies:
- Morse code alphabet work sheet printable (print ours)
- Glass bugle beads (I got ours from Michaels but you can get these from Amazon)
- Glass beads (I got ours from Michaels too but Amazon has this great kit)
- 0.5mm elastic string (you can find spools at the dollar store, craft store and on Amazon)
- Card stock or blank cards for gift-giving
- Scissors
- Optional: markers, glitter, stickers (whatever you have on hand)
Instructions:
- Decide what “secret” message you want to encode with beads. It can be something as simple as the friend’s name, something they really love, a pet, a favourite creature, video game or sport. It could also be empowering words or positive affirmations that mean something to the friend they’re making the bracelet for, like “I am strong”, “Dream big”, “I can do it”, etc.
- Next, using the work sheet, write the secret message on one line, and below it, using the Morse code key, encode the message using the correct sequences of dots and dashes for each letter. If there’s more than one word, use a / to separate your words.
- Decide on a colour scheme for the beads. The beads represent the dots, while the bugle beads represent the dashes. Some kids love symmetry and repeat patterns that are cohesive, while other kids like to mix it up, or even follow the order of rainbow colours (ROYGIV). My girls like repeat patterns, like having one colour for the dashes and one colour for the dots. We also reserved one colour as the “filler” bead, in the event that the message is too short for the length required to fit a wrist. Using the same bead colour as the filler also makes it easier to see where the Morse code message begins and ends. You can also use this same colour to separate your words, if your message contains more than one word.
- Cut a length of elastic string that’s longer than the size of the wrist so that you can easily tie the finished bracelet together. Make a loose knot on one end so that the beads don’t slip off as you string the beads.
- String your beads following the Morse code sequence you wrote out in step 2. Your child can use their own wrist to gauge if filler beads are required to fill in the bracelet and make sure the string is completely covered.
- Once complete, tie the ends tightly together and finish with a triple knot (where you loop the ends three times), but not too tight where the stretch in the string is engaged and the finished bracelet contracts. Cut the excess string. I left about 4 cm so that they can be tightened again if needed.
- The final step is all about presentation. Using some card stock or a blank card, write the message on the bracelet and the Morse code sequence. Decorate the rest of the card with markers, stickers, whatever you have on hand. Then make a cut of about 5 cm on each side. Stretch the bracelet over the card into the two slits you just made. If your card stock curls, make the cuts a little longer. You want the card to lie flat. Wrap in tissue paper, tie with a ribbon and voila!
In order to make a few of these bracelets at a time, it’s more efficient if you set up all the materials at a table and create a production line, starting with the Morse code message writing, followed by the bead stringing and finishing with the packaging.
Closing note: if your kids are learning to code, here’s how they can turn Binary code into bracelets too. I love this tutorial by Designmom.com.
About the author: Our senior copywriter, Melissa Thibodeau is a creative at heart, not just with words. Crafting, baking, home decor and DIYs are her passions. When Melissa isn’t making something with her daughters, you can find her in the garden or biking in the woods.